Dear followers and all the lovely people who arrived at this blog,
I have recently started transferring the recipes, reviews and the science to my new blog hosted by wordpress. New recipes will be presented there and I will be transferring the vast majority of recipes on this blog over too. I just find wordpress layout is more easily manageable.
If you are interested. Please use the the link below and follow my new blog on wordpress. Hope to see and speak to many of you again.
https://bakingfornerds.wordpress.com
Saturday 18 April 2015
Sunday 5 April 2015
Chocolate orange cake

Chocolate orange has always been one of those flavours I love, so I thought it's a nice once to get me back into baking. Though more work on piping is required. I hope the people who had given up chocolate for Lent will find this a worthy cake to attempt!
Ingredients
Chiffon sponge
- 3 large eggs (separate yolk and white)
- 105g plain flour
- 15g unsweetened coco powder
- 4g baking powder
- 100, 50g caster sugar (in separate bowls/container)
- 60ml vegetable oil
- pinch of salt
- 1 tsp vanilla extract
- 1 large orange (you need the zest and about 80ml orange juice)
- Pre-heat oven to 160 degree C (or 140 fan)
- You will need a 21cm round cake tin (DO NOT grease or line with parchment paper)
- Mix the egg yolks and 100g caster sugar together and mix until smooth
- Sift the flour and coco powder and baking powder and add to the egg
- Add the salt and orange zest, mix ingredients together
- Add a well in the middle of the batter
- Add the vegetable oil and orange juice
- Mix everything until smooth
- Beat the egg white with electric whisk until foamy
- Add 1 tbsp of caster sugar (from 50g container) at a time to the egg white
- Whisk until the egg white forms stiff peaks
- Put in 1/3 of egg white to the cake batter and gently fold it in
- Add the remaining egg white in two batches to the cake batter and CAREFULLY fold it in
- Pour the cake batter into the cake tin
- Run a large metal life slowly through the cake batter to remove large air bubbles
- Bake for 40-45 minutes
- Cool upside down on a wired rack (if the tin was greased, then it will just slip out of the tin)
Simplified chocolate mousse
- 100g dark chocolate (at least 70% coco)
- 50g caster sugar
- 400ml double cream
- 50g icing sugar
- Heat 200ml double cream with caster sugar until boiling, remove from heat and let it sit for a minute to cool down slightly
- Chop/break chocolate into small pieces
- Add the hot cream to chocolate
- Gently stir until chocolate has completely melted (chocolate ganache)
- Allow it to cool down to room temperature
- Whisk 200ml double cream with icing sugar until the cream forms soft peaks
- Once the ganache is cool and thick, add the whipped cream to the ganache and fold it in gently
Tempering chocolate
It is easier to temper a slightly larger amount of chocolate (preferably more than 100g high quality chocolate about 70% coco).
- For 100g dark chocolate
- Melt 70g chocolate over simmering water or on low power in a microwave
- Break/chop remaining 30g chocolate into small pieces
- Test temperature of melted chocolate and make sure it is below 50 degree C
- Add in the remaining chopped chocolate (which would rapidly cool down the chocolate) and stir until it has melted
- This chocolate is practically good to use for most people at home, but to make it better, the following optional step can be added
- (Optional) To make sure the melted chocolate has a higher proportion of seed crystal (it has a higher melting point and provides the crisp and harder texture to the chocolate), re-heat the melted chocolate until it reaches 31-32 degree C
- (Optional) This additional step melts chocolate crystal that is NOT seed crystal (lower melting temperature). The seed crystal in the melted chocolate would promote the other chocolate to take on the seed crystal structure and hence reduce the non-seed form
- Test the consistency of chocolate by dropping a amount onto a parchment paper using a teaspoon, if it spreads, then it is too runny to be piped
- Once the chocolate forms a more or less firm dot when dropped onto the parchment paper, then it is ready for piping into various shapes
Assembling
- Slice the cake horizontally in half
- Spread about 1/3 of chocolate mousse in the middle of the cake
- Pipe/spread the rest of the mousse on the side and top of the cake
- To decorate the top with orange slices, cut orange into thin slices and drain off the excess moisture with a clean kitchen cloth
- Place orange slices on top
- Decorate with chocolate decoration
Friday 3 April 2015
Hazelnut and Caramel cake

Let me get it straight, it's not the most beautiful cake, but it's not TOO bad for my first proper bake for about a year. So, here comes the first recipe of 2015! It is a fairly long recipe to guide beginners through one step at a time.
I'm going to describe the instructions for one thing at a time and then describe how to assemble the whole thing together last. Make the sponge and the creme patissiere first as these take a long time to cool.
Ingredients
Genoise sponge
- 4 eggs
- 125g caster sugar
- 125g plain flour
- 25g butter (melted and cooled down)
- YOU NEED AN ELECTRIC WHISK
- Line the bottom and sides of a 23cm round baking tin with baking parchment
- Pre-heat oven to 190 degree C (or 165 for fan oven)
- Put the eggs and sugar together in a large mixing bowl
- Whisk until the egg is thick and leaves behind a trail a ribbon when the whisk has been taken off, this step can take a long time, so put the mixing bowl over a pan of simmering water to slightly warm up the bowl (take care not to heat the egg too much or you might as well be making scrambled eggs)
- Sift flour and add it to the egg to one side of the bowl (not in the centre, as this makes mixing more difficult)
- Gently fold in the flour to the egg
- Add in the butter and gently mix again
- Bake for 30-35 minutes
- The cake should rise start to detach itself from the baking parchment on the sides of the tin
- Test with a clean skewer and the skewer should come out clean if the batter is completely cooked
- Remove cake from cake tin and take off all the baking parchment (careful not to damage the cake)
- Turn the cake upside down and let it cool on a wired rack, turn the cake every 5 minutes to avoid the cake from sticking to the rack (repeat at least 4 times)
- When the cake is cool, slice it in half horizontally
Creme patissiere
- 250ml milk
- 60g caster sugar
- 3 egg yolks
- 40g plain flour
- 1 tsp vanilla extract
- Heat milk in saucepan until it simmers
- Combine egg yolks and caster sugar and whisk until smooth
- Add flour to the egg and whisk again until smooth
- Add hot milk a little at a time to the egg and whisk the entire time
- Once all the milk has been added, return the entire mixture to the saucepan and leave it on medium heat
- Whisk the mixture continuously until it thickens (it should be quite thick at this stage)
- Add the vanilla extract and whisk for another 1 minute
- Remove the creme patissiere from saucepan and transfer it to a large bowl to cool down to room temperature
Chantilly cream
- 250ml double cream
- 50g icing sugar
- 1 tsp vanilla extract
- Mix all the ingredients together and beat with electric whisk until it thickens
Caramelised hazelnut
- 100g hazelnut
- icing sugar
- Heat the hazelnut on a hot frying pan for a few minutes
- Take it off and rub off the skin of hazelnut
- Return the hazelnut to the hot frying pan and sprinkle icing sugar over the hazelnut
- Heat until sugar has dissolved and coated the hazelnut
- Take off lightly caramelised hazelnut off the heat to cool down
- Reserve 15-20 hazelnuts on the side and roughly chop (or grind) the rest
Caramel decorations
- 150g granulated sugar
I have previously dissolved the sugar in a small amount of water first to make the caramel, but you can't stir that as it contains both dissolved and undissolved sugar, so stirring will mix the both together and form a lumpy sugar mixture instead of a smooth caramel. I have adopted the dry method this time. You will have to work quickly with the caramel decorations.
- Heat sugar in a saucepan (preferably not black in colour so you can tell the stage of caramelisation) over medium heat
- Stir occasionally (yes you can do this when the sugar is not dissolved in water beforehand)
- Once caramel is a dark shade of yellow (or a very light brown colour), turn the heat off
- When the caramel is still runny, use a metal spoon and sprinkle the caramel over a piece of baking parchment in the shapes you desire and let it cool to harden
- To make the hazelnut spikes, allow the caramel to cool down slightly in the saucepan so it is more viscous and less runny
- Pierce the hazelnut with a skewer/tooth pick and dip the hazelnut into the caramel
- Cover the hazelnut with caramel and lift it up and hold it for a few seconds so the excess caramel starts to drop down
- Move the hazelnut spikes and let the spike hang over the edge of a table and hold the skewer/tooth pick down with a heavy object
Assembly! (Finally)
- Fold in the chopped hazelnut, Chantilly cream into the creme patissiere
- Cover the bottom half of the genoise sponge with the hazelnut cream, be generous with the amount you put in
- Put the other half of the cake on top
- Pipe the cream over the top in any way you want and decorate with the candied and spiked hazelnuts
Saturday 28 March 2015
The Commitments: review
This is a non-technical review and views expressed here are my personal opinion only.
The Commitments, currently on show at the Palace Theatre in London West End has attracted a fair bit of attention recently and it is a worthy show to be added to your list of musicals to see.
Overall, the show ran relatively smoothly and was well executed. The passion and the difference in the personality of band members came through well and the cast put on a spectacular performance.
I would like to congratulate the young cast in the show, many of whom have made their West End debut in the Commitments. These include Andrew Linnie, Padraig Dooney and Peter Mooney (as Derek), who all put up some very good performances. Without a doubt, Brian Gilligan's performance as Deco was the star of the show and he was particularly charming. I even shared the annoyance of the other characters felt towards him, which is always a good sign that the character came through to the audience.
However, it is a relatively young musical, and I believe there are problems which can be resolved or ironed out over time. There is a large amount of scenery change and the constant movement of large stage sets was to me, quite distracting. Without technical expertise in this area, it is difficult for me to know what kind of stage setup would be more appropriate. Certainly, in other plays, a rotating stage has been used effectively to minimise the amount of props moved on and off stage to maintain the consistency of environmental layouts and avoid having numerous backstage members to move a large set off. Although a minor issue that can be easily overlooked, at times the dialogue felt stagnant and did not provide enough force to propel the show along until the next song starts.
Joey (played by Anthony Hunt)'s iconic scooter has appeared a number of times throughout the musical (perhaps too much in my opinion) and one can understand why it was used repeatedly. To carve that particular piece of equipment onto Joey's character and perhaps for building up to the finale (I won't spoil this). Nonetheless, the scene where Joey rode into the room with the scooter seemed unnecessary to me and simply adds to the list of things been moved on and off stage.
From the music side of the show, the songs were well done and definitely very enjoyable, especially the finale act, where the cast directly engaged with the audience, which is a wonderful addition to an already brilliant performance. There is a fair amount of spoken dialogues in the musical and from my point of view, the show would benefit from some degree of original musical pieces in place of the spoken conversations.
All in all, well done to the cast of the Commitments, it was a very enjoyable show.
Wednesday 13 August 2014
Chocolate truffle tart
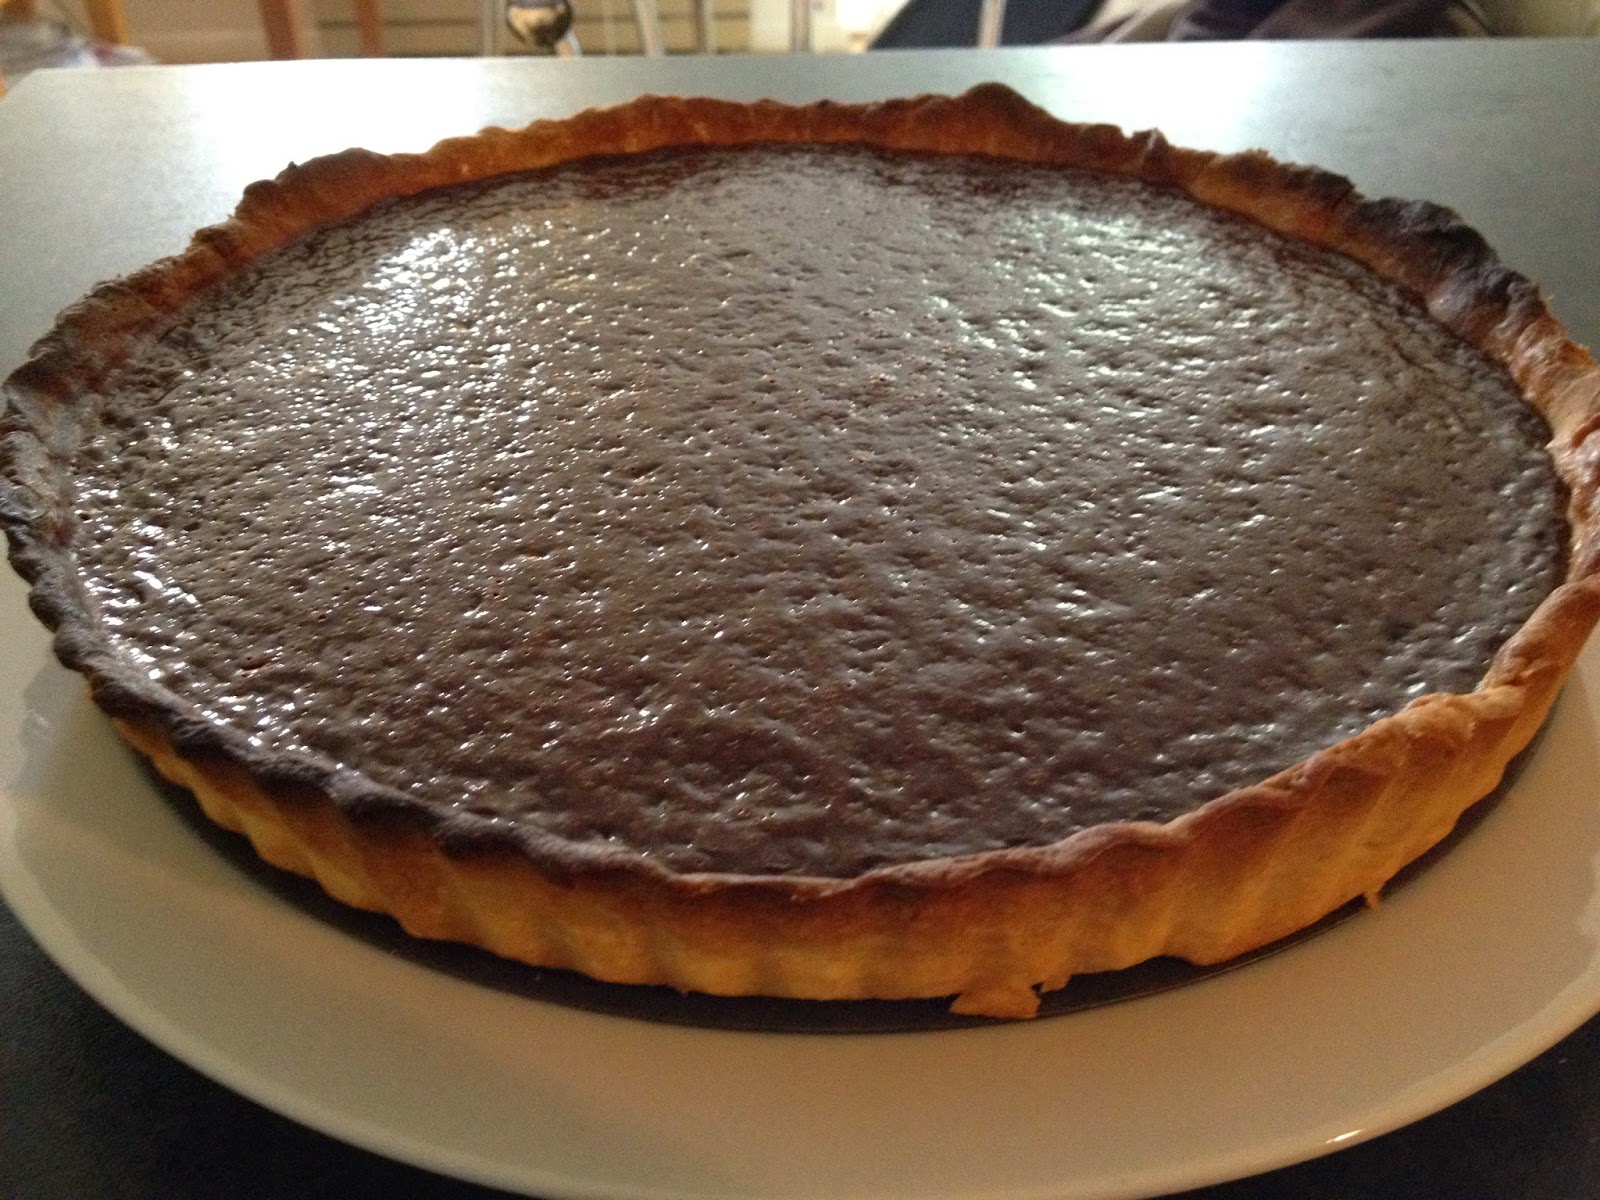
Ingredients
- 150g plain flour
- 20g icing sugar
- 70g + 25g unsalted butter
- Flour, icing sugar and 70g unsalted butter may be omitted if you are using shop bought shortcrust pastry
- 1 whole egg
- 2 eggs, yolk and white separated
- 180g double cream
- 120g milk (full fat or semi skim)
- 220g dark chocolate (70% coco), or if you prefer something sweeter replace 40g of dark chocolate with milk chocolate
- small pinch of salt
- Mix flour, icing sugar together and combine with a metal spoon
- Cut 70g butter into small cubes and put them into the flour, icing sugar mixture
- Rub the butter into the flour with your finger tip until the butter has been incorporated into the mixture and that the final product resembles breadcrumb in texture
- Beat 1 whole egg and add half of the egg into the mixture and combine, if it is not incorporating completely, add a little bit more egg until the pastry is smooth and no longer sticks to your hand (try not to overwork the pastry though). At this stage, if the pastry is very soft and messy, put it into the fridge and chill for 20-30 minutes. If not, continue
- Lightly dust work surface with plain flour
- Roll out the pastry to about 2-4mm thick
- Put the pastry into the tart tin, if you accidentally ripped the pastry, don't worry, you can patch it up with leftover pastry
- Prick the base of pastry with a fork multiple times to allow air to escape from the pastry when it is baked and prevent it from rising
- Chill pastry in tart tin in the fridge for 30 minutes, pre-heat oven now to 200 degrees C (175 fan)
- Lay a large piece of parchment paper on the pastry and fill with baking beans
- Bake with baking beans on top for 10-15 minutes, or until the base is relatively dry
- Take off baking beans and parchment paper
- Lightly brush the pastry with bean egg white, you don't need all the egg white, so you will have quite a lot of leftovers
- Put pastry back in the oven and bake for another 5-7 minutes, it should turn golden quite quickly
- Take tart base out of oven
- Reduce oven temperature to 170 degrees C (150 fan)
- Break chocolate into small pieces in a large bowl
- Prepare filling by heating cream and milk together until it just starts to bubble, take it off the heat and let it cool down for one minute
- Pour hot cream onto chocolate and stir until the chocolate has completely melted
- Add the egg yolk, butter and pinch of salt to the chocolate and whisk until everything has been incorporated and is smooth
- Pour the chocolate into the tart base and return the whole tart to the oven and bake for 10-15 minutes (oven dependent)
- The side of the filling should be set and middle will wobble a little bit (if the middle doesn't wobble, then it is over baked and the sides will likely shrink away from the edges of the tart when it is cooled)
Sunday 3 August 2014
Lime and mint chiffon cake

Ingredients
- 150g self raising flour
- 200g caster sugar
- 4 large eggs, separated
- 50g mint (stalk and leaves)
- 80ml vegetable oil
- 5 limes
- 50ml water
- 400ml double cream
- 80g icing sugar
- Blueberries and raspberries for decoration
- Pre-heat oven to 170degrees C (150 fan)
- Mix flour and 100g caster sugar together
- Boil mint stalks in 50ml water for 15-20 minutes over low heat
- Remove stalks from water and let the water cool down to room temperature
- Add vegetable oil, zest and juice from 3 limes, water and 4 egg yolks to the dry ingredients and mix well
- Whisk egg white until foamy and gradually add 100g caster sugar to the egg white one tablespoon at a time until all the sugar has been added and the egg white forms stiff peaks
- Add 1/3 of egg white to the cake batter and mix it in
- Add the remaining egg white to the cake batter and very gently fold it in
- Gently pour cake mix to an 18cm round cake tin
- Bake for 50-70 minutes, the cake should rise well. Test with skewer and it should come out completely clean if the cake is cooked
- Cool the cake upside down for 1 hour
- Prepare filling by mixing cream with zest and juice from 1 lime and whisk until the cream is thick
- Slice cake horizontally into 3 equal layers
- Spread the cream between each layer and on the exterior of the cake
- Decorate with the remaining lime, berries and leftover mint leaves
Sunday 6 April 2014
Lemon and passion fruit chiffon cake

- 3 lemons
- 180g self raising flour
- 1/2 tbsp baking powder
- 250g + 90g+50g caster sugar
- pinch of salt
- 100ml vegetable oil
- 8 large eggs
- 1 tsp vanilla extract
- 300ml milk
- 400ml double cream
- 40g icing sugar
- 2 passion fruits
- 50g corn flour
- 70g + 80g unsalted butter
Cake
- Preheat oven to 170 degrees (150 fan)
- Combine flour, baking powder, salt together in a large mixing bowl
- Add vegetable oil, vanilla extract, juice and zest from 2 lemons and 5 egg yolks into the dry ingredients and mix until well combined (should be dropping consistency, if not, add 10-20ml of water and mix again)
- Beat 6 egg white with electric whisk until foamy and add 1 tbsp of caster sugar at a time to the egg white until 250g has been added, whisk until stiff peak
- Add 1/3 of egg white to the rest of the cake batter and very gently fold it in. Repeat until all egg white has been added
- Pour cake mix into a 23cm round bundt cake tin (without greasing or baking paper), or if you don't have a bundt tin, use a normal 23cm round tin and roll up a piece of foil to place in the middle of the tin, so the cake mixture can cling to it and climb up and also reduces the middle from dropping when taken out of the oven.
- Baking time of this cake is very variable. Bake for 45-70 minutes and keep a very close eye on the cake. Test with skewer after 35 minutes and use your own judgement from there. The cake should rise and increase in volume
- Cool the cake upside down over wired rack to prevent it from collapsing (hence no greasing or baking paper, or the whole cake will fall out). If cake has risen higher than cake tin, place 2 glass cups on either side of the cake tin and let the glasses hold the cake tin from the side
- Let the cake cool for at least 1 hour
Mousseline
- Beat 1 egg yolk and 1 whole egg together with 90g of caster sugar
- Beat in 50g corn flour and zest from 1 lemon
- Heat 300ml of milk in saucepan until warm and add to the egg/sugar/cornflour mixture and whisk continuously
- Return the entire mixture to the saucepan over low-medium heat
- Whisk mixture continuously until it thickens
- Remove from heat and stir in 70g butter until it has completed melted and incorporated into the mousseline
- Let it cool completely
Lemon and passionfruit curd
- Beat 1 whole egg with 50g caster sugar
- Whisk in lemon juice from half a lemon
- Put mixture over medium heat and stirring continously with wooden spoon
- Reduce the volume down slightly and add 80g unsalted butter
- Mix until melted and let it cool for 30 minutes
- Add the passion fruit to the curd and mix well and cool in the fridge
Assemble the cake
- Cut cake horizontally in half
- Place mousse line into the middle of the 2 halves
- Whisk double cream with icing sugar until it forms stiff peak
- Pipe or spread cream over the cake
- Place the lemon and passion fruit curd over the top of the cake
Thursday 30 January 2014
Pain au chocolat
Unfortunately, I don't have a photo to share this time. But I swear I'll upload one as soon as I make this again. Essentially, this is very similar to my pain au raisins recipe, but I'm uploading this separately due to popular requests.
Ingredients
Ingredients
- 160g + 30g plain flour
- 170 bread flour
- 45g + 100g caster sugar
- 2g salt
- 4 whole eggs + 4 egg yolks
- 60g water (more accurate than 120ml, as 1ml=1g of water)
- 14g instant dry yeast (about 2 sachets)
- 150g unsalted butter (important!!! room temperature and very soft)
- 300ml milk (full fat or semi-skimmed)
- 100g dark chocolate
- 1 tsp vanilla extract
- Combine 160g plain flour, 170g bread flour and 45g caster sugar together and mix
- Add salt to one side of the dry ingredients and yeast to the other side of the flour. Do not mix them, as it will kill the yeast
- Make a well in the middle of the mixing bowl, add water and 3 whole eggs into the mix and mix with dough hook on your mixer for 2-3 minutes on low speed until ingredients have combined
- Cut butter into 10-15 small cubes and add 1 cube at a time to the mix. Continue the mixer on low-medium speed
- Once all the butter has been incorporated, keep mixer on medium for another 15 minutes, the dough should become sticky and shiny
- Turn mixer speed up to medium high for another 2 minutes. You should hear the dough slapping against the side of the mixer at this stage. If the dough looks loose and wet, add 1 tbsp of plain flour and beat for another two minutes
- Seal mixing bowl with cling film and let it rise either at room temperature for 2-3 hours or in the fridge overnight. The dough should double to triple in size
- Whilst the dough is rising, make the pastry cream (creme patissiere). Beat the egg yolks, 100g sugar together really well
- Add plain flour and mix again until it thickens
- Heat milk to simmering point and pour into the egg yolk mix, whisking continuously!!!
- Pour all the contents back into the saucepan and keep it on medium heat and whisk continuously until it thickens (it's NOT going to go REALLY thick)
- Add vanilla extract to that pastry cream once it is thick
- Let it cool to room temperature (will take about an hour)
- Place a layer of cling film on table surface and lightly dust with plain flour
- Roll out the dough to a rectangle on cling film (approximately 50cm x 25cm)
- Spread the pastry cream evenly on the dough
- Break up the chocolate and sprinkle evenly over the dough and pastry cream
- Use the cling film to help roll up the dough, so the pastry cream and chocolate are inside
- Tuck in the sides, so the pastry cream and chocolate are not going to spill out
- Place a piece of baking paper on baking tray and layer your bread on it
- Seal the baking tray with cling film and let it rise again for another 90 minutes and it should increase in volume again
- After about 60-70 minutes of rising, pre-heat oven to 190 degrees C (170 fan) and place a small tray of water on the bottom of the oven (about 300ml), to reduce the bread from forming a hard crust surface as it bakes
- Remove cling film and beat 1 whole egg and brush egg wash on the dough
- Bake in the oven for 30-40 minutes, but water carefully, depending on your oven, it may take as little as 25 minutes
- Take out of the oven and let it cool for a couple of hours and slice into 10-12 pieces to serve
Saturday 25 January 2014
Double chocolate and strawberry cheesecake

This is NOT a baked cheesecake, but it is vegetarian (but NOT vegan) friendly. Low fat cream cheese and cream may be used to substitute the full fat if you want (honestly, I can't tell the difference between full and low fat when it's chocolate flavoured).
Ingredients
- 150g digestive biscuits
- 60g butter melted
- 2x200g cream cheese
- 100g icing sugar
- 100g dark chocolate (50-70%)
- 100g white chocolate
- 280ml double cream
- 250g strawberries
- Crush biscuits and stir in the melted butter
- Press biscuit firmly into the bottom of a 20cm round baking tin (preferably spring form, so you can take it out easier)
- Melt dark chocolate in microwave (careful with power setting as it will burn if heated at high power) and leave it to cool
- Meanwhile, beat the double cream until it forms stiff peaks
- Beat icing sugar into 200g cream cheese
- Mix in dark chocolate and half of the whisked cream
- Layer the cheesecake filling on top of the biscuits and chill for 30-60 minutes in the fridge
- Wash, drain and slice strawberries in halves and layer on the dark chocolate cheese filling
- Melt white chocolate in microwave (again, be careful with microwave power setting) and let it cool for 5 minutes
- Mix in white chocolate and the remaining cream into 200g of cream cheese and put it on the dark chocolate layer and chill for at least an hour before serving
Saturday 23 November 2013
Christmas cupcakes

Hi all! It has been a long time since I had time to write a post (I still don't really, but I have 20 minute incubation time in the lab this morning). So seeing christmas is fast approaching and where would we be without a couple of festive recipes. Today, I will be sharing my cupcake recipes, the black forest cupcake and the good old chocolate orange cupcake. Tip number one, use colourful cupcake cases and not the regular plain ones (they simply ruin the festive season). Each recipe make 6 cupcakes, but just double the recipe if you want to make 12.
Ingredients (black forest cupcake)
- 65g unsalted butter (at room temperature and VERY soft, you may need to put it on the window sill directly above the radiator for a little bit if you room is very cold
- 90g caster sugar
- 1 large egg
- 100g self raising flour
- 1 tbsp coco powder
- 50ml milk (full fat or semi skimmed)
- 100g dark chocolate (at least 50% coco solid, melted and cooled) + extra for shavings
- 120g morello cherries with kirsch
- 150ml double cream (whipped until soft peaks)
- 20g icing sugar
- Bring butter to room temperature and make sure it is soft. This can take a very very long time, especially in the winter. If you want to speed up the process, follow Mary Berry's method and cut butter into cubes and add in luke warm water to the butter and let it soften for 2-3 minutes and drain off the water
- Melt 100g dark chocolate, set aside to cool and use 50g to pipe into the shape of christmas trees (makes about 6 trees)
- Pre-heat oven to 170 degrees C (150 fan)
- Line 12 well muffin tin with cupcake cases
- Cream butter and caster sugar together and soft and creamy
- Add egg, flour, coco powder and milk into the mixture and combine them all together
- Fold in the melted chocolate into the cake batter
- Divide the cake mix into the cupcake cases
- Quarter 6 cherries and put 4x quarters into each cupcake cake
- Bake for 15-18 minutes, or until risen. Test with clean skewer and it should come out clean
- Take it out of the oven and let it cool to room temperature
- Whip the cream until soft peaks and fold in the icing sugar
- Pipe cream on the cupcakes and decorate with the remaining cherries, piped chocolate tree
- Use a fine grater to grate a block of chocolate directly above the cupcakes to decorate with shavings
Ingredients (chocolate orange cupcakes)
- 65g unsalted butter (very soft and room temperature)
- 100g caster sugar
- 1 large egg
- 100g self raising flour
- 30ml of freshly squeezed orange juice
- Orange zest from 1 whole orange
- 30ml milk (full fat or semi skimmed)
- 120g dark chocolate (45-60% coco solid), broken into small pieces
- 70ml double cream
- 1 tsp of orange extract
- Make the chocolate orange ganache first by boiling the double cream with 25g caster sugar
- Once the cream is boiled and sugar completely dissolved, take it off the heat and swirl it in the saucepan for a minute and add to the chocolate
- Stir chocolate until it has melted and stir in 1 tsp of orange extract and about 1/3 of the orange zest
- Leave the ganache in the fridge to firm up a little until piping consistency
- Pre-heat oven to 170 degrees C (150 fan)
- Cream the soft butter and 75g caster sugar together
- Add eggs, flour orange juice to the mixture and mix slightly
- Gradually add in the milk until everything the batter has been incorporated
- Divide the cake batter into the cupcake cases
- Bake for 15-18 minutes or until well risen and the skewer comes out clean when tested
- Take it out of the oven and allow it to cool down to room temperature
- Pipe the chocolate orange ganache over the cupcake
Subscribe to:
Posts (Atom)